Saturday, October 17, 2009

Book Review: Couture Sewing Techniques by Claire B. Shaeffer

Like many sewers and crafters, I've assembled a reference library of fun and useful books. One of my favorites - a book I purchased for myself years ago - has proven to be Couture Sewing Techniques by Claire B. Shaeffer, first published in 1993 and now available in paperback. Sewers might already be familiar with her patterns for Vogue Patterns and her articles for Threads magazine. Don't let the "couture" in the title scare you: this book is remarkably practical for the home sewer who wants to take that next step upward in technique. It's not for true beginning sewers, but anyone at a low intermediate level should be able to apply many of the included techniques. All sewers can benefit from the sections on tools and pressing techniques.

Ms. Shaeffer has spent several decades studying, using, and researching traditional couture techniques, acquiring a collection of garments and reference materials. As she discusses in the introduction, she chose to focus on construction techniques in this book rather than design, draping, pattern making, etc. She also carefully selected those construction techniques she felt would be of most use to the home sewer.


She begins with a history of haute couture and a discussion of just what makes something "couture" (according to one industry professional, the distinguishing feature is the amount of handwork). Along the way we learn about the process of ordering a couture garment as well as what goes on behind the scenes during actual garment construction. I found this section one of the most fascinating in the book - I love learning about the process of executing any complicated endeavor.

Handwork is the heart of couture construction, and so early on we have a review of basic hand sewing techniques and tools.
  • Needles and their uses
  • Threads and their uses
  • Tools
  • Stitches, including how to start and end a line of stitching
  • General workroom techniques
The stitch section includes both temporary and permenent stitches. I was surprised by the number of different construction stitches the first time I read the book - I count nearly 20 varieties, some being subtle variations on others but with distinct uses. All are accompanied by instructions for use and execution as well as clear line drawings in the style used in Threads magazine (Couture Sewing Techniques is a Taunton Press publication).

The bulk of the book consists of specific construction elements, the couture method of executing those elements - often with a comparative discussion of the relevant ready-to-wear methods - and practical application for the home sewer. Ms. Shaeffer provides many examples of actual couture garments - from Dior to Adrian to Vionnet - many of which use very clever solutions to construction problems and which also demonstrate the techniques she is documenting. Among the many topics covered are
  • Pressing tools and techniques
  • Seam finishes
  • Hems
  • Closures
  • Pleated skirts
  • Fitting a basic bodice
  • Stays
  • Sleeves (an entire chapter!)
  • Pockets
  • Tailoring basics (this one chapter alone is worth the price of the book)
  • The iconic Chanel suit
  • Eveningwear
Going back through the book while writing this review, I was impressed all over again with how much information the author fit into 217 pages. Ms. Shaeffer has created an interesting and useful melding of history, construction philosophy, and practical technique. I, personally, have refered to this text for both specific How To and broader inspiration.

Understanding the type of work that goes into the highest-end clothing has changed my approach to clothing construction for both streetwear and costumes. I can actually tell the difference in how garments fit and hang when I take the time to apply the techniques I learned in Couture Sewing Techniques. I cannot recommend the book highly enough.

Thursday, June 25, 2009

Yarn Over


I took a semi-impulse trip to London in early May. I hadn't been over in ages but didn't think I would be able to make a trip until next year. The recession, however, has been a boon for travelers: I found a fabulous package deal in late March and decided to venture across the pond!

Naturally, I brought along some knitting, although I didn't actually carry it on the plane in either direction: I wanted to make sure I slept on the flight over, and they don't allow knitting needles in carry-on luggage when flying out of the U.K. But I figured I would pull out the needles while on the Tube, waiting in lines, relaxing in my room, etc. So I invested in circular needles suitable for the sock project I had designated for the trip and bundled up my cute little GoKnit pouch. I normally use double-pointed needles for socks, but they can be a bit of a hassle while knitting on-the-go (I've lost one or two at baseball games, much to my dismay).

Like any self-respecting knitter, I was determined to do a little shopping in some of the London's yarn shops! I did some research on Ravelry looking for recommendations and settled on two shops that would be easy to get to by Tube within zone 1 - turned out to be good choices since there wound up being partial shut-downs of the Tube over the weekend because of rail work.

My first stop was at 
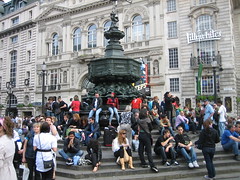
I Knit London in a neighborhood behind Waterloo station. Because of the aforementioned rail works, I had to get off at the Westminster Tube station and walk across Westminster Bridge. It was a gorgeous day - and a bank holiday weekend - so that meant that the bridge was packed with visitors, vendors, and street performers. (How do the locals stand we tourists?) But once across the bridge, the crowds miraculously disappeared. The shop is located in Lower Marsh Street and was clearly a non-touristy area, despite its proximity to Big Ben et al. The cheery yellow sign was easy to spot:


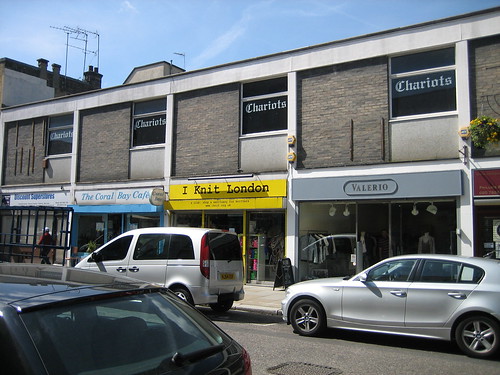
The shop itself has a fairly typical layout for the genre with square wall bins of yarn, some comfy seating, and an excellent selection of tools, books, and patterns. The yarn options were many and varied - including a number I had never seen before in both conventional and unconventional fibers (even a really cool plastic yarn in fun, bright colors). They didn't have a particularly large selection of cotton or cotton-blend yarn, but that is perhaps attributable to the cooler climate - as compared to Philadelphia, that is - which translates into a longer wearing season for wool.


The shop advertises its selection of U.K. yarns, and I did hear a fellow Yank asking about them - not a huge range, but interesting. The shop assistant was very nice and helpful, and, after much deliberation, I purchased two skeins of Malabrigo sock yarn (a sophisticated variegated green and an inky blue kettle-dyed) plus a set of square double-pointed needles from Kolláge that I'd been anxious to try.

Upon leaving I Knit, I walked up the street the opposite direction from which I had come and made a wonderfully serendipitous discovery of a pretty little park, Waterloo Millennium Green, where I sat amongst the flowers by an Asian-inspired bridge and stream to eat my lunch. Egg & cress sandwich - one of my favorites!

After an annoying trek around Waterloo Station, I made my way to my next target, 
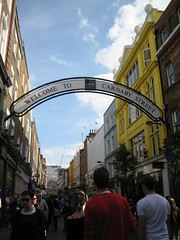
All The Fun Of The Fair in the Carnaby shopping district off Oxford Street. I really do not like Oxford on the weekends - it's just way too packed - but it was unavoidable. The Carnaby area is a pedestrian shopping zone of what appear to be converted factories and warehouses. There are courtyards of shops off the central spine of Carnaby Street, and the yarn shop was in Kingly Court, a charming spot with three levels.


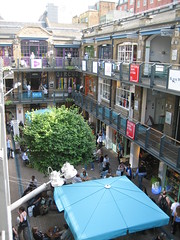
All The Fun is on the third level and is a tiny little nook of a shop. Their selection of yarns is small but thoughtful, and they have a truly unusual collection of whimsical buttons, charms, notions, and pre-made knit items - including amazingly realistic donuts, cakes, and biscuits rendered in yarn! As busy as the courtyard below was, the yarn shop was a relaxing oasis of soothing colors and natural light.

I browsed for quite a while and finally selected five skeins: one of a lace-weight merino silk from Grignasco in a pale aqua and four skeins of Patons' Linen Touch DK in two different colors (pale blue and natural). I plan a shawl with the Grignasco and several spa accessories with the Linen Touch.

And despite all the money I spent on yarn, I did show a small bit of restraint: I had stopped in Liberty at the corner of Great Marlborough and Carnaby Streets before heading to All The Fun Of The Fair and visited their fabric department. I somehow managed to not buy any of their gorgeous prints!

Thursday, June 4, 2009

A Project and Shopping


One of my costuming projects for the coming convention season is Queen Sai (alt. Saiou) from the Twelve Kingdoms anime. She's a rather obscure character, appearing in only two episodes, but I like that - I'm not likely to see five other cosplayers as the same character. The anime is based in both plot and aesthetics on Chinese mythology, and her outfit is a much-simplified version of traditional Chinese robes.

I'm making her robes from silk habotai for several reasons:
  • Light weight to fight the summer heat.
  • Easy to dye and work with.
  • It's silk! Love it, and it's reasonably historically accurate.
For those interested, I bought my silk (and dying supplies) from Dharma Trading Co., one of my favorite sources for costuming needs. I'll be decorating a silk paddle fan with silk painting, but I'm going to hand embroider the simple floral design on Saiou's outer coat/robe. I'm a casual embroiderer: it's a craft I've practiced off and on since high school, but it's never been a great passion. But I plan on this costume being a competition piece, so I've been gathering reference materials (such as Painting with a Needle: Learning the Art of Silk Embroidery by Young Yang Chung) and seeking out better quality materials than I normally use.

I plan to do the embroidery in silk threads and was pleasantly surprised to discover a needleworking shop near me that carries a fabulous selection of such supplies, Fireside Stitchery. I spent a fun hour this past Saturday testing all sort of color combinations and comparing different types of silk thread. Who knew there were so many? I finally settled on Soie d'alger in a range of pinks and greens since I'm going for a more naturalistic look than shown in the flat anime art, bringing home a precious little stash of skeins.

I have to draft a pattern, make a muslin (test garment), and dye the fabric before starting the embroidery. Also at issue is how to mount the fabric for doing the work. The size of the piece plus the rather fragile fabric are making for a tricky balancing act. While I'd love a slate frame (one day, one day...when I start that 18th-century gown...), I'll probably wind up with careful hooping. I might indulge and at least get a higher quality hoop than I currently own. I've considered doing the embroidery on smaller pieces of fabric and treating the pieces as removable motifs, but I'm not sure what that would do to the drape of the garment. I might at least experiment with that approach to see what happens - it would certainly make cleaning the costume easier!

Friday, April 24, 2009

Mad About Hats

I love hats.

I love wearing hats. I love looking at hats. I love making hats. When I found out that the Victoria & Albert Museum has a special hat exhibit going on right now, I took it as a sign that my trip to London was meant to be. I took a millinery course in college, and it remains one of my favorite classes these many years later.

I don't own a large number of hats, primarily because they tend to take up a fair amount of space. Most of the hats I wear on a regular basis are small, soft, and easily rolled up. But I do go all out for costume hats. My pride and joy is the silk-covered top hat I made for my Millennium Earl costume (from the D.Gray-man manga & anime).


I hand wove the checkered hat band from 1" (2.5cm) wide black and ivory silk ribbon, shaping it to fit the tapered shape of the crown. The hat lining matches the lining of the costume's waistcoat. I don't always go to such lengths in finishing costume pieces, but I get a particular joy out of fussing with all the little hand stitched seams and trims of a hat.

When making a hat, you're dealing with small lengths of fabric, small quantities of trim, so it's possible to work with higher quality materials than you might otherwise be able to afford. The Earl's very tall top hat required less than a yard of silk twill, so, even though I used about 12 yards of silk ribbon, the materials cost probably totaled about $50. Pretty good bang for the buck considering how much an accurate and well-made hat can add to a costume.

So don't shy away from millinery work. It's a bit fussy, but it's not particularly difficult. Most structured hats - as opposed to soft, unstructured ones such as berets - must be put together by hand. The Earl's top hat has exactly one machine-stitched seam (up the center back of the crown). But handwork is great for movie watching time! In future posts I'll talk about various categories of headgear, cover some basic techniques, and provide additional references and sourcing information.

Introduction

Hi, I'm Kris, and I'm a textile and handcrafting fanatic living in the Philadelphia suburbs. I'm just setting up my first public blog and am working on a number of ideas for the coming weeks. I hope to cover a range of topics related primarily to sewing, beadwork, knitting, crochet, costuming/cosplay, and other handcrafts.

Hope to see you here often!