Introduction
Left-handers who want to learn how to knit are often told they should just use the right-handed method. After all, you use both hands equally, right? This approach does work for a certain number of lefties, but for the rest of us our brains and hands just can't get the hang of the process.
I'm a self-taught knitter and so didn't have anyone trying to force me into a certain method. I found a few beginner books and web resources, resorted to holding up pictures to the mirror, and finally figured out how to get those stitches to work. I was knitting socks and sweaters within a matter of months and am currently teaching myself Fair Isle style colorwork.
I taught myself to knit because I wanted a Harry Potter Ravenclaw scarf (book colors, please). Having a specific goal in mind can be a great motivator to learning!
It took me a while to realize I knit continental style. I think it came to me naturally because I also crochet. I've tried English - or throwing - style but find I can't work as fast. So most of what I'll show here is continental, although I will include some information on the throwing style. Try both and see what works best for you. I have been using throwing style more of late because I've settled on the two-handed approach to colorwork: one color per hand.
Getting Started
Some of the terms used below might be unfamiliar. I'll do my best to explain them along the way, but don't hesitate to ask questions of the staff in the shop where you're buying your tools and supplies. Websites that sell knitting supplies almost always have information available - and sometimes even live customer support via chat.
Oh, and I will invariably refer to measurements in inches, yards, etceteras. I will do my best to also give the metric equivalent when critical, but I'm sure I will miss some. Please comment if anything is unclear in that quarter.
Supplies
The only thing you need for this first project is yarn. Get a worsted weight yarn. It's thick enough to be easy to handle without being overly bulky. Check the label for something called the gauge, although it might not be marked using that word. This tells you how many stitches per inch the yarn will make on the listed needle sizes. You're looking for something in the range of 4.5 to 5.0 stitches per inch on US6 to US9 (4.0mm to 5.5mm) needles.
Wool really is the best fiber to start with unless you have a true allergy or live in a tropical climate. Cotton and linen have very little spring and can be harder for the beginning knitter to work with. Wool is also more forgiving of mistakes.
Yarn is packaged for retail sale in two basic formats: as a ball or a skein. A ball is wound and ready for use, usually with a yarn end at the center to pull for your starting point. A skein is more like how embroidery thread is wrapped. It must be wound into a ball before you can use it, otherwise it's impossible to control and will tangle horribly. If you're buying your yarn at a general craft store, it will almost always be in a ball. If you're getting it from a yarn shop, it could be in either format, but they will be able to wind your yarn if you choose one in a skein.
Tools
You don't need many tools to start knitting.
- Knitting needles.
The options can be overwhelming. I recommend bamboo or other wood as it's easier on the hands than metal, but you might find you prefer the more slippery quality of the latter. You can get a pair of straight needles or you can get circular needles. If you get the latter, make sure the set is at least 24" (60cm) long.
For this first project get size US 8 (5mm). The size refers to how thick the needle is: the weight of the yarn and the size of the needle are directly related. In general, the heavier the yarn, the thicker the needle, and vice versa. - Yarn needle. This is a blunt-tipped needle with a large eye. You will need this to weave in your loose yarn ends.
- Ruler. To measure your personal gauge: how many stitches you get per inch with your needles and yarn. Special knitting gauges are available, but any ruler will work.
- Scissors.
- Row-counter. Optional for this project, but very helpful for larger, more complex designs.
Casting On
This is a basic, two-strand method of casting on. It's pretty elastic in the finished garment and is easy to start with.
I recommend casting on over two knitting needles to prevent making the loops too tight. But if you tend to make fairly loose stitches naturally, try casting on with just one needle.
- Holding the needles in your left hand, form a slip knot about 15" from the end of the yarn. (The exact length of the tail will be determined by how many stitches you need to cast on.) Insert the needles in the loop.
- Tighten the slip knot. Wrap the tail end of the yarn (the loose end) around the base of your right thumb. Wrap the working yarn (the end coming out of the ball of yarn) around your right index finger. Bring the two yarn strands together in your palm and control with the other fingers of your right hand.
- Bring the needle points around the outside of the yarn loop on your thumb. Tuck the needles under and come up through the loop.
- Reach the needle points around to the left and down into the loop around your index finger, catching the yarn on the needles.
- Bring the needle point back down into the thumb loop. Pull the yarn through the loop and drop the yarn from your thumb, forming a stitch on the needles.
- Tighten and repeat for the required number of starting stitches.
Carefully draw one of the knitting needles out of the stitches, leaving fairly loose loops on the holding needles.
Demo: Casting On
 |
| Form a slip knot to begin the two-strand cast on. Use two needles to prevent a too-tight starting row. |
 |
| Loop the two strands around your right thumb and index finger. Control the tension with the rest of your fingers. |
 |
| Bring needles up into thumb loop. |
 |
| Reach across and bring needles down into index finger loop. Catch yarn on needles. |
 |
| Bring needles down into thumb loop. Drop loop from thumb. |
 |
| Snug stitch up against needles and repeat. |
Knit Stitch
Hold the needles with the empty one in your left hand. This is the working needle. The needle with the loops you just cast on goes in your right hand.
You have two choices for how to hold the working yarn (the end coming out of the ball of yarn):
- Continental
Hold the working yarn in your right hand. Wrap around your fingers in a way that feels comfortable (it will take some experimentation) and "flick" the yarn around the left needle tip. This is the method you'll see me using most of the time. - Throwing, aka English
Hold the working yarn in your left hand with the working needle. Again, experiment to see what feels comfortable for you in how you wrap the yarn around your fingers. Push the yarn across to loop around the tip of the left needle.
Hold the yarn behind the needles.
- Insert the point of the left needle into the first loop on the right needle from front to back.
- Wrap the working yarn around the tip of the needle from back to front.
- Draw the yarn through the loop on the right needle.
- Allow the loop to drop from the right needle.
- You've made your first knit stitch!
Continue to the end of the row. All the loops should have been knit from the right needle to the left one. Turn your work and switch hands with the needles. If you continue making rows with the knit stitch, you will wind up with a pattern called Garter Stitch, which has a distinctive, bumpy texture that is the same on both sides of the fabric.
FYI, the iconic scarf worn by Tom Baker of Doctor Who fame was done entirely in Garter Stitch. It's a long project, but doable for a beginner since it is nothing but knit stitch. It offers a great opportunity to get in a lot of practice.
Forming Knit Stitch
 |
| Holding yarn behind needle, insert left needle into first loop on right needle. |
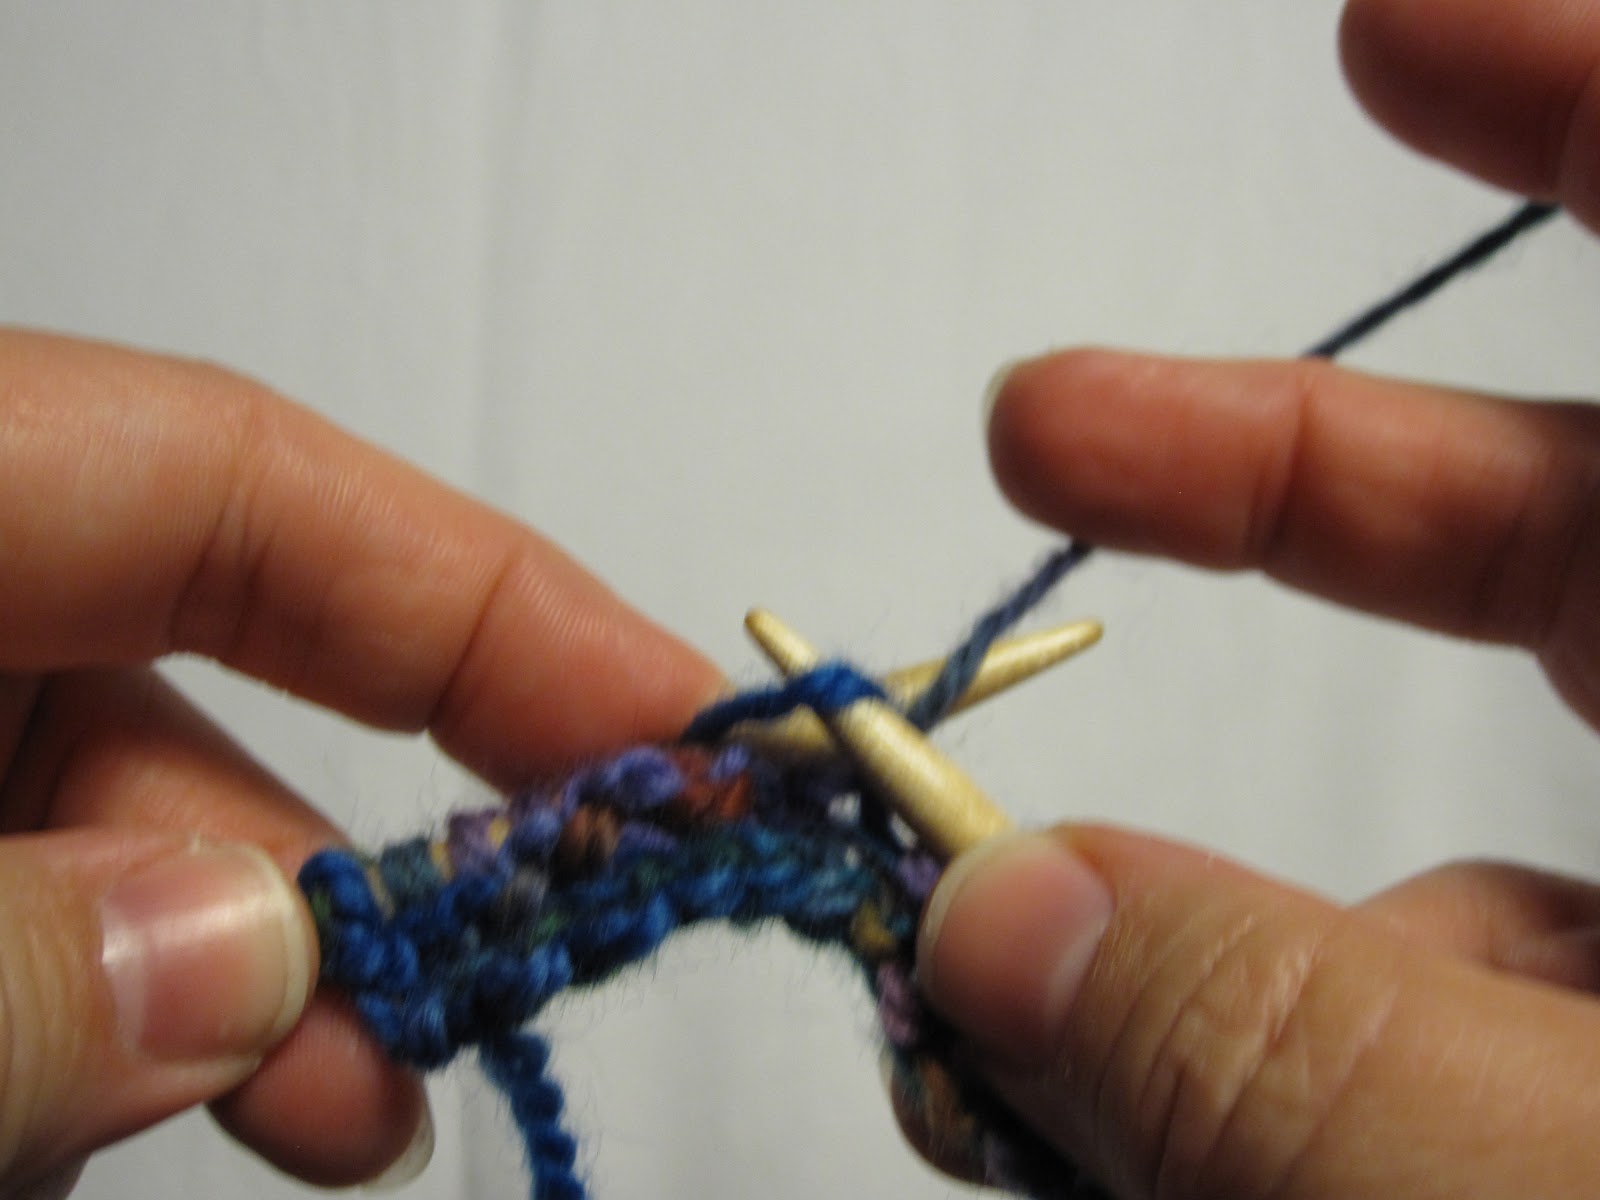 |
| Wrap working yarn around left needle from back to front, pulling yarn up and catching on left needle. |
 |
| Pull yarn through loop to front. Allow loop to drop from right needle. |
Purl Stitch
Hold the needles in the same manner as you do for knitting: empty one in your left hand, filled one in your right.
- Insert the point of the left needle into the first loop from left to right, bringing the left needle in front of the right needle.
- Wrap the working yarn around the tip of the left needle from bottom to top around the front of the needle.
- Draw the yarn through the loop on the right needle.
- Allow the loop to drop from the right needle.
- You've made your first purl stitch!
Continue to the end of the row. All the loops should have been purled from the right needle to the left one. Turn your work and switch hands with the needles. If you continue making rows by alternating full rows of knit and then purl, you will wind up with a pattern called Stockinette Stitch. This stitch has two distinct sides and is what people most commonly think of as knit fabric. The knit side is smooth, and the stitches form little V's. The purl side is bumpy and closely set.
Forming the Purl Stitch
 |
| Holding yarn in front of the needle, insert left needle into first loop on right needle. |
 |
| Wrap yarn around left needle from bottom to top around front. |
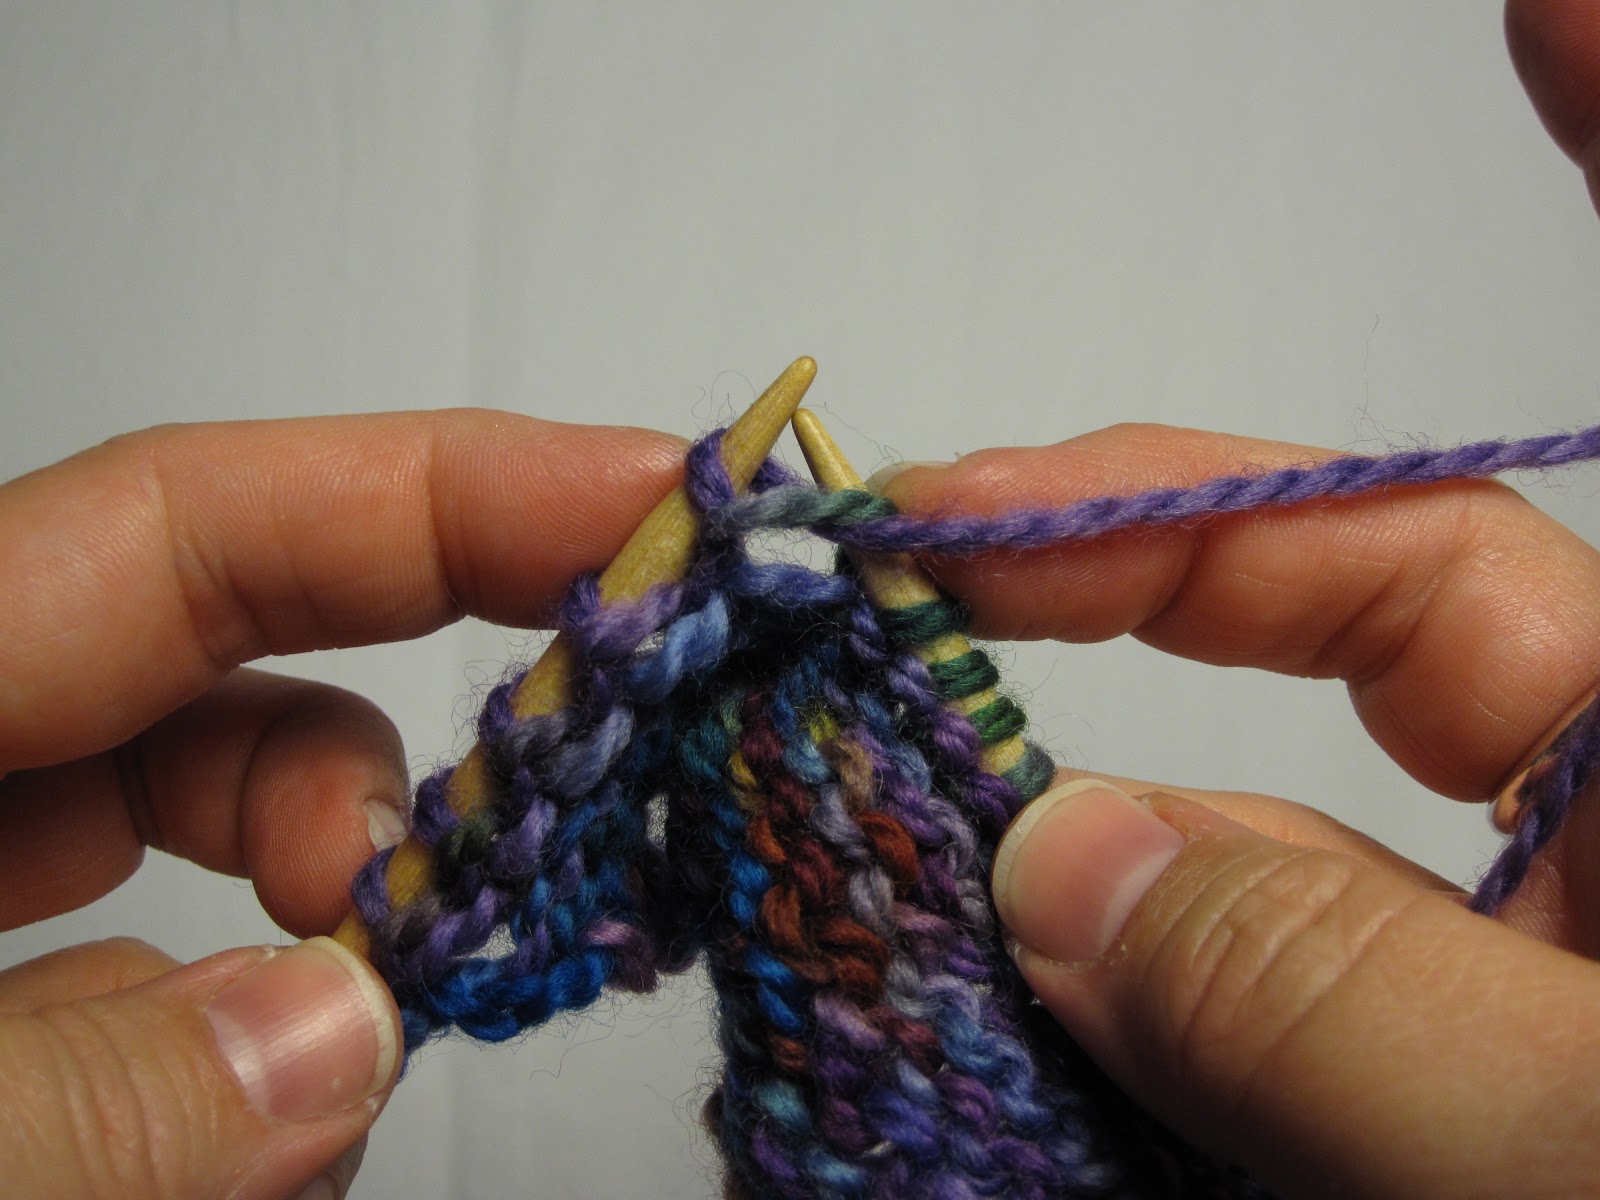 |
| Draw yarn through loop on right needle. Allow loop to drop from right needle. |
Casting Off
This is a basic and versatile method of casting off, or ending your work. I'm showing it from the knit side, but you can cast off from the purl side and even "in pattern" (where you follow a textured pattern while casting off). Practice keeping the cast off stitches loose: it's easy to make this too tight so the edge draws up.
- Start on the knit side of the work.
- Knit the first two stitches.
- Using the right needle, pick up the next-to-last stitch on the left needle and lift it over the last stitch. Allow to fall off the needles. You should have one stitch left on the left needle.
- Repeat across the row.
- When you get to the last stitch and it's on your left needle, cut the working yarn leaving a tail of about 6".
- Draw the end through the last stitch and pull gently to draw up the stitch and secure the work.
- Weave the yarn ends (at both ends of the work) through several stitches on the wrong side of the work. Cut close to fabric.
A Note About Gauge and Blocking
Gauge
Gauge simply means how many stitches per inch (or centimeter) you get with your personal knitting tension and the particular needles and yarn you've used. If you're making something like a pot holder it's not that critical, but with most other items you must calculate this number when starting a project.
To measure your gauge, cast on 20 stitches and knit 20 rows of stockinette stitch (alternate rows of knit stitch with purl stitch). Ideally, you should cast off and block the piece before measuring (see below). At the minimum, measure this little swatch from the knit side, counting from the tip of each V shape to see how many stitches you have per inch across the fabric. Measure going up and down to see what your vertical gauge is.
The instructions for your pattern will tell you how many stitches per inch you need to get the right measurements in the finished product. If you have too few stitches per inch (the stitches are too big), try going down a size - getting smaller - with your needles. Switch to larger needles if you have too many stitches per inch.
Blocking
Blocking is the process of hand washing your project and then carefully shaping it on a flat surface to the right size and shape. Wool is very malleable while wet and can be adjusted up and down a bit. Blocking will also smooth the stitches and help them settle into place - this is where a lot of your little tension problems will go away as if they never happened.
Gauge and Stitch Patterns
 |
| Measuring gauge with a standard ruler. |
 |
| Measuring gauge with a knitter's needle and stitch gauge. |
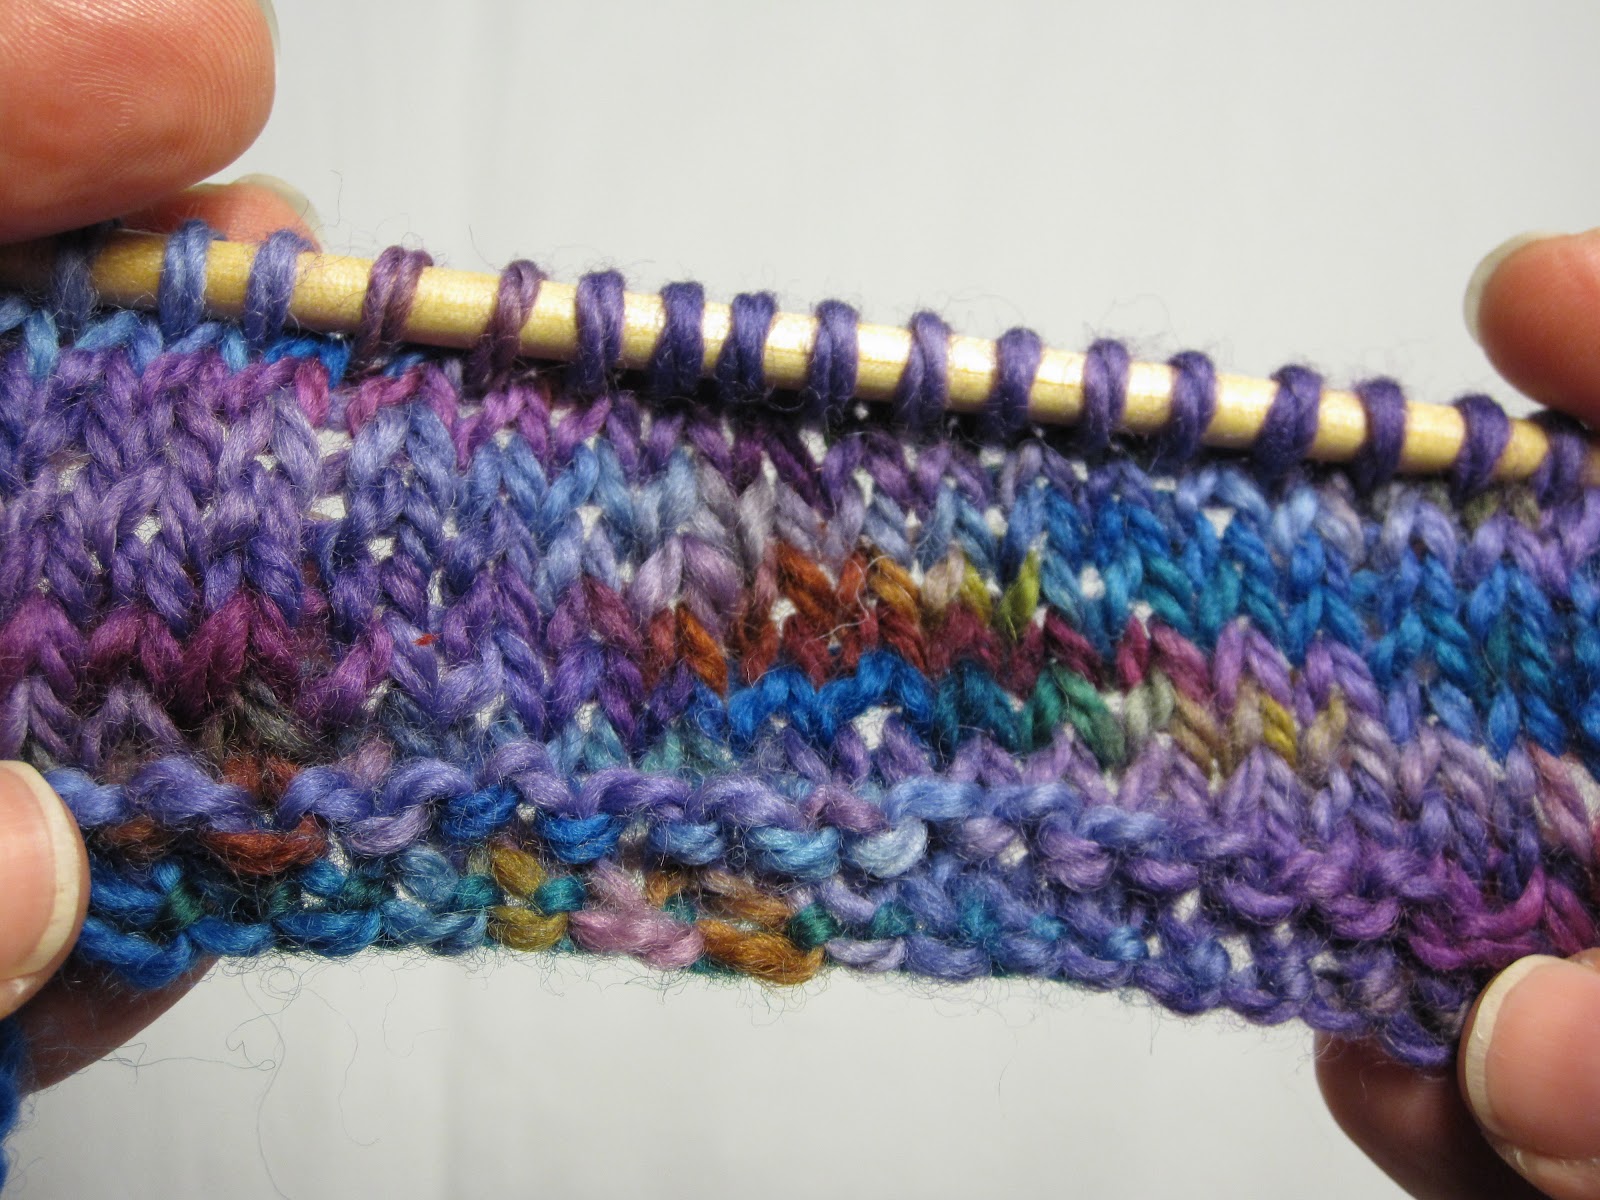 |
| The bottom couple of rows are garter stitch. The rest of the sample is the knit side of stockinette stitch. |
 |
| The bottom couple of rows are garter stitch. The rest of the sample is the purl side of stockinette stitch. Garter stitch tends to be a bit more open. |
Other Resources
There are tons of websites, books, and magazines out there for knitters. A great community - and one with excellent tools for tracking your yarn stash and patterns - is Ravelry. You can find forums for all sorts of knitting interests and geographically based groups as well as a massive online pattern repository.
One of the best books I found while learning to knit was Knitting for Dummies (currently in its 2nd edition). It includes all the basics you need to get started and also provides an introduction to more advanced techniques such as colorwork. I also found a Susan Bates book, Learn to Knit, incredibly helpful because it includes both right and left handed instructions. It's now out of print, but you can find used copies out there.
I have become an avid sock knitter, although now that I'm trying to learn colorwork I've also delved more into mittens (Latvian and Norwegian Selbu styles, in particular). So try a variety of techniques and projects to see what strikes your fancy as you improve your skills!







 Posts
Posts

